Table top AR simulator in VR
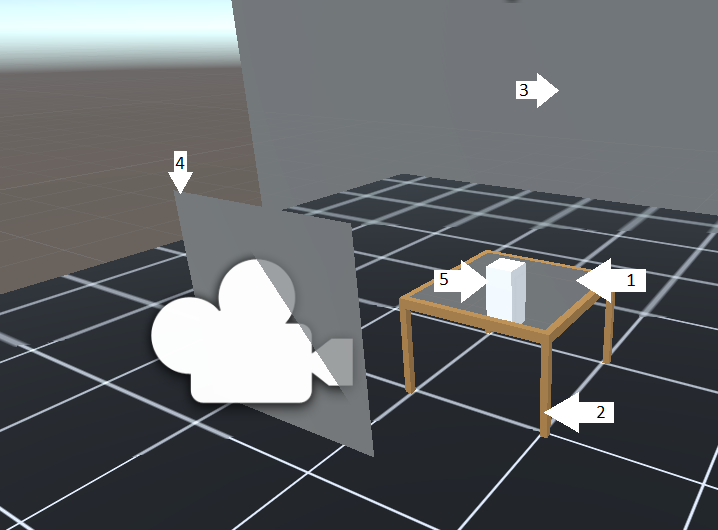
This is a little VR environment I made that simulates a 3D display on a tabletop. Think of Chewie and R2D2 playing Dejarik on the Millennium Falcon in Star Wars. I wanted get an idea how such a system might look and feel and to prototype for any future hardware being developed. The simulator actually clips the 3D content to the projection surface on the table. This should be similar to the way an actual device works.
I had some fun getting this to work in Unity3D. It uses the SteamVR plugin and the clipping effect is layered on with a set of custom shaders that make use of the stencil buffer . All of these shaders run before the opaque geometry queue and they end up stetting up a hole in the depth buffer that is the only place subsequent geometry can render.
This is done in five steps.
- In the Geometry - 3 queue the simulated retroreflective display surface on the table is rendered to the stencil buffer. Color and depth buffer writes are turned off for this shader. It creates a mask that is used by later rendering stages.
- In the Geometry - 2 queue the room features like the table and floor are rendered. This shader doesn't draw over the area masked by stencil. This leaves a hole on the simulated table top.
- Also in the Geometry - 2 queue a background is rendered using quad that is aligned perpendicular to camera at a distance. ( I'll get to the reason for this a little later. )
- In the Geometry - 1 queue another quad is rendered that is aligned perpendicular to camera and is right up next to the near clipping plane. This is also masked by the stencil and does depth buffer writes but not writes to the color buffer. So it doesn't display anything but does set zbuffer to the minimum value everywhere except over the table top.
- All the rest of the scene objects are assumed to be on the table top. They are rendered in the standard way. Any fragment that would be the the field of view outside of the table top display area will fail the depth test.
So a simpler way of doing would have been to skip steps 3 and 4 and just do step 5 using another custom shader that only rendered on top of the stencil mask. This however would have meant creating custom shaders for all the content including things like particle effects. The method above means that no custom shaders are required for the main content.
This works but it has a few weird side effects.
The first side effect is the reason the background quad is needed. Normally the background would be cleared by the sky box which is rendered last and draws on all areas of the screen that were not previously rendered in the curent frame. These are the areas where the depth buffer is at the maximum distance. However step 3 above sets a lot of the depth buffer to the near value without actually drawing anything. This means that areas of the screen are not cleared and may contain artifacts from the previous frame. So the background quad in step 3 basically clears the screen before the Z mask is written.
The second side effect has to do with the way Unity draws shadows. This stencil buffer method keeps the geometry from being rendered but it doesn't keep it from casting shadows. This ends up creating weird shading artifacts on the table sides and floor. I fixed this by making the table and floor not receive shadows. This works fine for my purposes and I'm not sure what a more correct solution would be. Maybe when the scriptable shader pipeline comes along in Unity two different shadow passes could be done.
Here is source for the various shaders. I don't have a lot of shader fu so these are just tweaked from existing examples that I found.
xxxxxxxxxxShader "Custom/Retroreflective" {SubShader{Tags { "RenderType" = "Opaque" "Queue" = "Geometry-3"}ColorMask 0ZWrite offStencil {Ref 1Comp alwaysPass replace}CGINCLUDEstruct appdata {float4 vertex : POSITION;};struct v2f {float4 pos : SV_POSITION;};v2f vert(appdata v) {v2f o;o.pos = UnityObjectToClipPos(v.vertex);return o;}half4 frag(v2f i) : SV_Target {return half4(1,1,1,1);}ENDCGPass {Cull BackZTest AlwaysCGPROGRAM#pragma vertex vert#pragma fragment fragENDCG}}}Shader "Custom/Room"{Properties{_Color ("Color", Color) = (1,1,1,1)_MainTex ("Albedo (RGB)", 2D) = "white" {}_Glossiness ("Smoothness", Range(0,1)) = 0.5_Metallic ("Metallic", Range(0,1)) = 0.0}SubShader{Tags { "RenderType"="Opaque" "Queue" = "Geometry-2"}Cull BackZTest LEqualStencil {Ref 1Comp notequal}CGPROGRAM// Physically based Standard lighting model, and enable shadows on all light types#pragma surface surf Standard fullforwardshadows// Use shader model 3.0 target, to get nicer looking lighting#pragma target 3.0sampler2D _MainTex;struct Input{float2 uv_MainTex;};half _Glossiness;half _Metallic;fixed4 _Color;// Add instancing support for this shader. You need to check 'Enable Instancing' on materials that use the shader.// See https://docs.unity3d.com/Manual/GPUInstancing.html for more information about instancing.// #pragma instancing_options assumeuniformscalingUNITY_INSTANCING_BUFFER_START(Props)// put more per-instance properties hereUNITY_INSTANCING_BUFFER_END(Props)void surf (Input IN, inout SurfaceOutputStandard o){// Albedo comes from a texture tinted by colorfixed4 c = tex2D (_MainTex, IN.uv_MainTex) * _Color;o.Albedo = c.rgb;// Metallic and smoothness come from slider variableso.Metallic = _Metallic;o.Smoothness = _Glossiness;o.Alpha = c.a;}ENDCG}FallBack "Diffuse"}Shader "Custom/MaskZ" {SubShader{Tags { "RenderType" = "Opaque" "Queue" = "Geometry-1"}ColorMask 0ZWrite onStencil {Ref 1Comp NotEqual}CGINCLUDEstruct appdata {float4 vertex : POSITION;};struct v2f {float4 pos : SV_POSITION;};v2f vert(appdata v) {v2f o;o.pos = UnityObjectToClipPos(v.vertex);return o;}half4 frag(v2f i) : SV_Target {return half4(1,1,1,1);}ENDCGPass {Cull BackZTest alwaysCGPROGRAM#pragma vertex vert#pragma fragment fragENDCG}}}